
SpringBoot
SpringBoot与微服务
SpringBoot
官网:Spring Boot
概念:
约定优于配置,简单来说就是你所期待的配置与约定的配置一致,那么就可以不做任何配置,约定不符合期待时才需要对约定进行替换配置。
特征(官网版)
- 创建独立的 Spring 应用程序
- 直接嵌入Tomcat,Jetty或Undertow(无需部署WAR文件)
- 提供固执己见的“入门”依赖项以简化构建配置
- 尽可能自动配置 Spring 和第三方库
- 提供生产就绪功能,如指标、运行状况检查和外部化配置
- 绝对无需生成代码,也无需 XML 配置
特征:
-
SpringBoot Starter:他将常用的依赖分组进行了整合,将其合并到一个依赖中,这样就可以一次性添加到项目的Maven或Gradle构建中。
-
使编码变得简单,SpringBoot采用 JavaConfig的方式对Spring进行配置,并且提供了大量的注解,极大的提高了工作效率,比如**@Configuration和@bean注解结合,基于@Configuration完成类扫描,基于@bean注解把返回值注入IOC**容器。
-
自动配置:SpringBoot的自动配置特性利用了Spring对条件化配置的支持,合理地推测应用所需的bean并自动化配置他们。
-
使部署变得简单,SpringBoot内置了三种Servlet容器,Tomcat,Jetty, Undertow.(无需部署war包)我们只需要一个Java的运行环境就可以跑SpringBoot的项目了,SpringBoot的项目可以打成一个jar包。
-
场景启动器(starter)
-
提供生产级特性:如监控指标,健康检查,外部化配置等
- 监控指标,健康检查(k8s)
-
无代码生成,无xml
微服务
(55条消息) 微服务架构——马丁弗勒(中文版论文完整版)_微服务架构论文_火火笔记的博客-CSDN博客
第一个SpringBoot程序
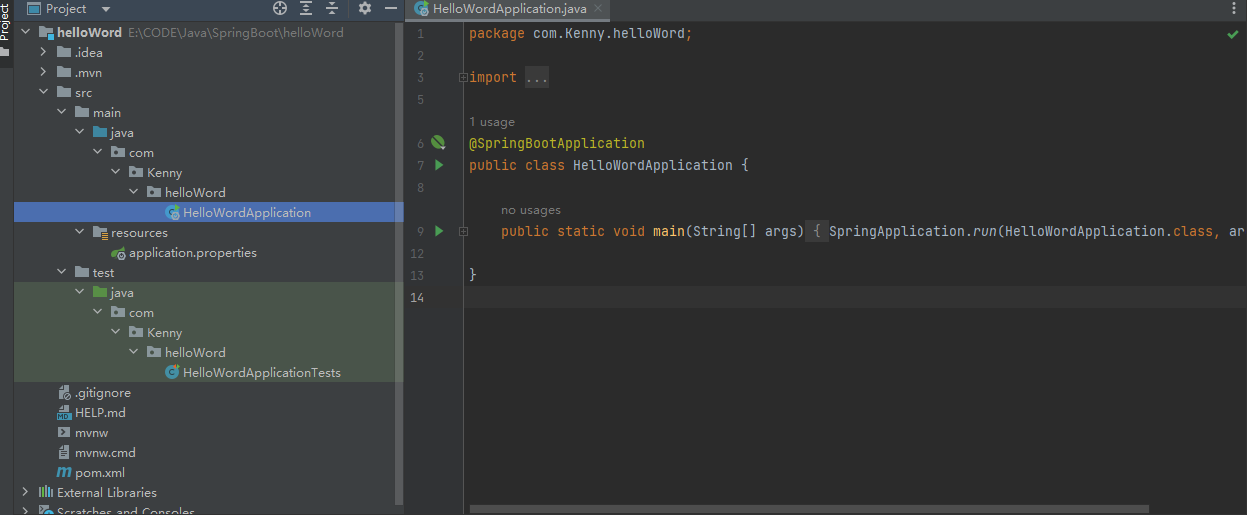
- HelloWordApplication
- 程序主入口
- application.properties
- 配置文件
1 | <dependency> |
这个依赖 spring-boot-starter-web(Web 启动器) 来为 Web 开发予以支持。spring-boot-starter-web 为我们提供了嵌入的 Servlet 容器以及 SpringMVC 的依赖,并为 Spring MVC 提供了大量自动配置,可以适用于大多数 Web 开发场景。
- 说人话:有这个,就可以通过端口打开网页
helloworld
入口文件同级文件夹下,新建controller包,写一个控制器

1 |
|
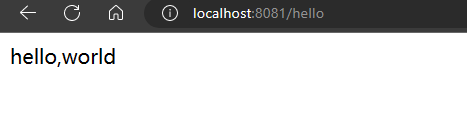
运行入口程序,浏览器输入端口号以及对应页面
小技巧
如何改端口号
在application.properties中,添加server.port=xxxx
更改banner (启动时的命令行那一行字)
在网上找banner字体生成(直接网上搜索springboot banner,有很多)
在resources下新建banner.txt,把banner放进去
原理
自动装配
狂神说SpringBoot02:运行原理初探 - 遇见狂神说 - 博客园 (cnblogs.com)
pom.xml
-
spring-boot-dependencies :核心配置在父工程中
-
我们写或引入SpringBoot依赖的时候,不需要指定版本,就是因为有版本仓库
启动器:
1 | <dependency> |
- SpingBoot的启动场景
- 比如spring-boot-starter-web,会帮我们导入Web环境的所有依赖
- SpringBoot会将所有场景都变成一个个的启动器
- 需要什么功能,就只需要找到对应的启动器就可以了
starter
主程序
1 | //@SpringBootApplication : 标注这个类是一个springboot应用;启动类下的所有资源被导入 |
注解
@SpringBootApplication
1 | @SpringBootConfiguration :springboot的配置 |
结论:springboot所有自动配置都是在启动的时候扫描并加载:spring.factories.所有的自动配置类都在这里面,但是不一定生效,要判断条件是否成立,只要导入了对应的stt,就有对应的启动器了,有了启动器,我们自动装配就会生效,然后就配置成功!
1.springboot在启动的时候,从类路径下/META-lNF/spring.factories获取指定的值;
2.将这些自动配置的类导入容器,自动配置就会生效,帮我进行自动配置!
3.以前我们需要自动配置的东西,现在springboot帮我们做了!
4.整合javaEE,解决方案和自动配置的东西都在spring-.boot-autoconfigure-2.2.0.RELEASE.jar这个包下
5.它会把所有需要导入的组件,以类名的方式返回,这些组件就会被添加到容器;
6.容器中也会存在非常多的xxxAutoConfiguration的文件(@Bean),就是这些类给容器中导入了这个场景需要的所有组件;并自动配置,@Configuration,JavaConfig!
7.有了自动配置类,免去了我们手动编写配置文件的工作!
启动
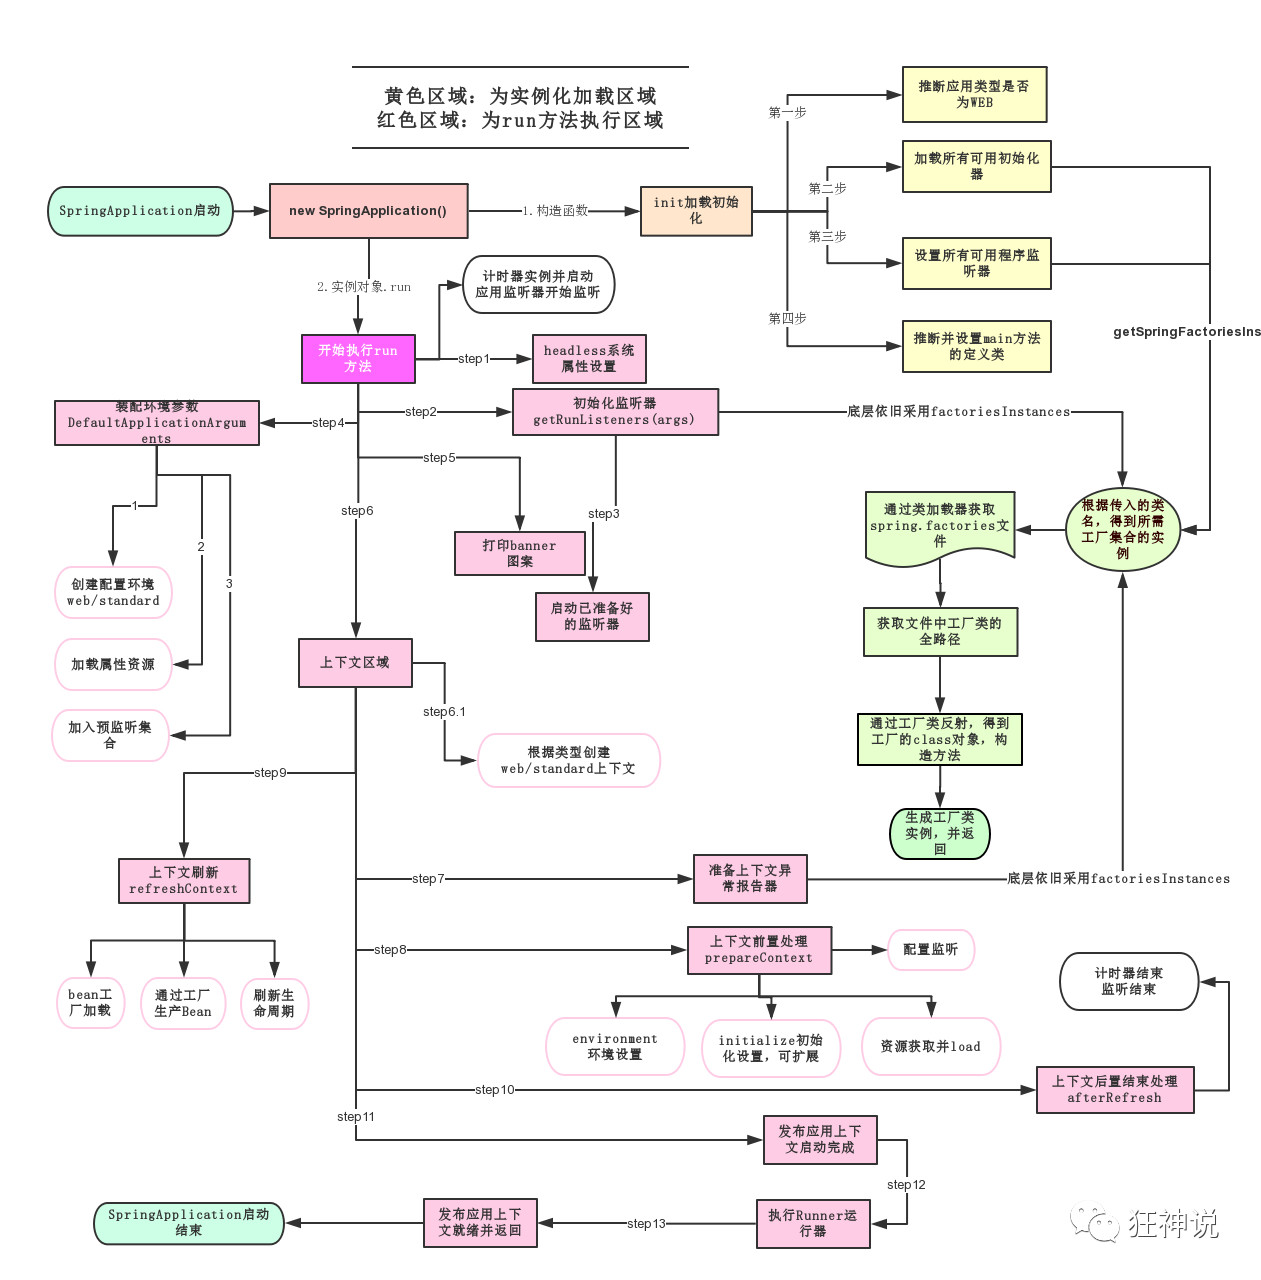
SpringApplication类和run方法
这个类主要做了以下四件事情:
1、推断应用的类型是普通的项目还是Web项目
2、查找并加载所有可用初始化器 , 设置到initializers属性中
3、找出所有的应用程序监听器,设置到listeners属性中
4、推断并设置main方法的定义类,找到运行的主类
Run方法
SpringBoot配置
yaml与properties
Spring Boot使用一个全局的配置文件,配置文件名称是固定的
- application.properties
- 语法结构:key=value
- application.yaml
- 语法结构:key:空格value
给属性赋值的方式
@Component //注册bean
@ConfigurationProperties作用:
ConfigurationProperties(prefix = "person")
将配置文件中配置的每一个属性的值,映射到这个组件中:告诉SpringBoot将本类中的所有属性和配置文件中相关的配置进行绑定参数prefix=“person”:将配置文件中的person下面的所有属性一对应只有这个组件是容器中的组件,才能使用容器提供@ConfigurationProperties功能
对比@Values
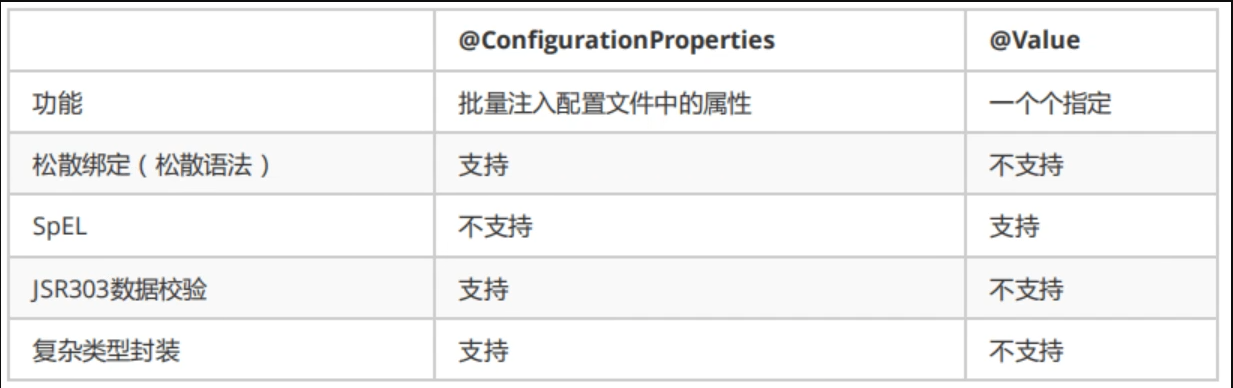
cp只需要写一次即可,vaue则需要每个字段都添加
松散绑定:这个什么意思呢?比如我的yml中写的last-name,这个和lastName是一样的,-后面跟着的字母默认是大写的。这就是松散绑定
JSR303数据校验,这个就是我们可以在字段是增加一层过滤器验证,可以保证数据的合法性
复杂类型封装,yml中可以封装对象,使用@vaue就不支持
结论:
- 配置yml和配置propertiesi都可以获取到值,强烈推荐yml
- 如果我们在某个业务中,只需要获取配置文件中的某个值,可以使用一下@value
- 如果说,我们专门编写了一个JavaBean:来和配置文件进行映射,就直接使用@configurationProperties,不要犹豫!
JSR303校验
JSR-303是 Java EE 6 中的一项子规范,叫做 Bean Validation,官方参考实现是hibernate Validator。用于对Java Bean中的值进行验证
1.Bean Validation 中内置的 constraint
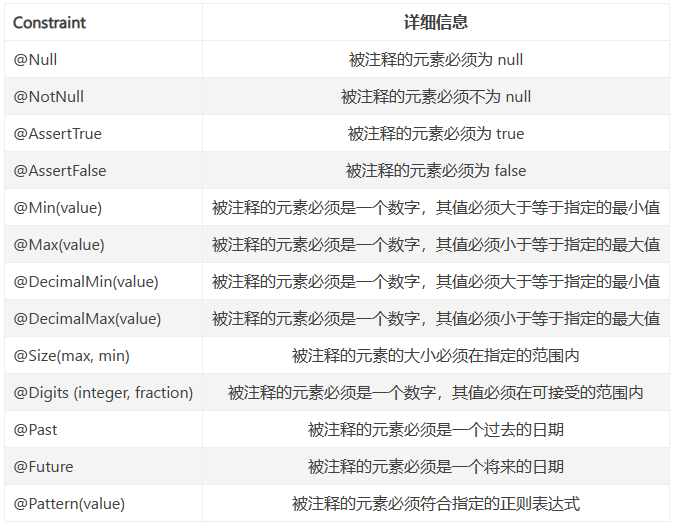
2.Hibernate Validator 附加的 constraint
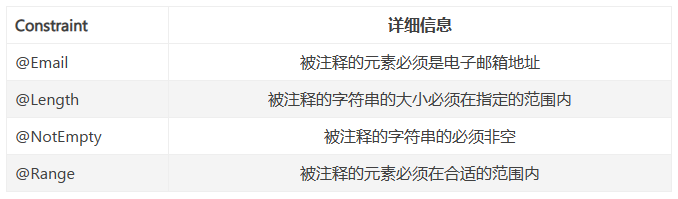
示例
1 |
|
1 |
|
SpringBoot Web开发
SpringBoot帮我们做了什么?
-
xxxxAutoConfiguration - 向容器中自动配置组件
-
xxxxProperties:自动配置类,装配配置文件中自定义的一些内容!
静态资源
在SpringBoot中,可以通过以下方式处理静态资源
- webjars 映射到域名:端口/webjars/
- public, static, /**, resources 映射域名:端口/
优先级:resource > static (默认) > public
首页如何定制
首页包括页签图标直接放在static里面即可
模板引擎
- 如果需要使用thymeleaf,只需要导入对应依赖
spring-boot-starter-thymeleaf就可以了
导入之后,将html放在templates即可
- 在HTML的头部添加thymeleaf的约束
1 | <html lang="en" xmlns:th="http://www.thymeleaf.org"> |
- 使用th标签
1 | <div th:text="${msg}"></div> |
所有的htmL元素都可以被thymeLeaf替换接管:th:元素名
thymleaf语法
中文文档https://fanlychie.github.io/post/thymeleaf.html
官方文档https://www.thymeleaf.org/doc/tutorials/3.0/usingthymeleaf.html
提取公共页面
1 | th:fragment='sidebar' |
插入
1 | th:insert="~{path::sidebar}" |
页面国际化
- 需要配置i18n文件
- 如果需要在项目中进行按钮自动切换,我们需要自定义一个组件LocaleResolver
- 记得将自己的组件配置到spring容器
@Bean
1 | <a class="btn btn-sm" th:href="@{/index(l='zh_CN')}">中文</a> |
1 | public class MyLocaleResolver implements LocaleResolver { |
1 |
|
处理404
在templates下建立error文件夹,把404.html页面放进去
前端ui
- elementUI
- anti-admin-vue
数据库
整合JDBC
1 | #数据库配置 |
连接数据库
1 |
|
使用JdbcTemplate,可以执行sql语句
JdbcTemplate封装了很多对数据库的操作,拿来即用
1 |
|
DRUID
Druid是阿里巴巴开源平台上一个数据库连接池实现,结合了C3PO、DBCP、PROXOOL等DB池的优
点,同时加入了日志监控。
Dud可以很好的监控DB池连接和SQL的执行情况,天生就是针对监控而生的DB连接池。
Spring Boot2.0以上默认使用Hikari数据源,可以说Hikari与Driud都是兰前Java Web上最优秀的
数据源,我们来重点介绍Spring Boot如何集成Druid数据源,如何实现数据库监控。
1 | spring: |
1 |
|
整合mybatis
整合包: mybatis-spring-boot-starter